Don’t worry, we’ve all been there… Getting your kick drum sound right can be a frustrating part of music production. Making your kick drum and bass work together can be especially difficult.
Thankfully, we’ve gone through the headaches so you don’t have to. This is your one-stop article for getting that kick sound right every time.
Getting started
Firstly, think about the sound you’re going for.
Are you making heavy industrial techno? Classic jungle? Deep dubstep? Maybe a hybrid of genres you want to bring together?
This should influence your choice of kick drum sample, its tail length, how it’s pitched and where it sits on the frequency spectrum.
EQ and compression will never make the wrong kick drum sound right, so making the right choice early will save you countless hours.
Let’s look at the first two genres - techno and jungle.
Both genres separate the kick and bass into different parts of the frequency spectrum for better clarity and impact.
The first often has low, booming kicks that occupy the sub-range around 40-60Hz, with basslines sitting above in the higher register of the low end.
The second has short, punchy kicks sitting much higher at around 80-100Hz to make space below for deep, heavy basslines.
You would struggle to get a 4x4 track to sound like heavy industrial techno if it had short, higher-pitched kicks that didn’t provide the oomph underneath the bass.
Likewise, a jungle track would sound muddy if it had low, booming kicks trying to compete with sub basslines.
These two approaches can be used as a guideline for many genres.
The ‘techno’ approach is useful for kick-heavy genres like house, trance and gabber. It also applies to some styles of hip-hop.
The ‘jungle’ approach is useful for bass-music genres like drum and bass, dubstep, UK garage and bassline. It can also work with grime.
Don’t worry if you’re not hot on genre names. Essentially, you just need to consider what role your kick plays in the track.
Does it boom and thud, carrying the weight of the track? Or does it add punctuation to a booming bassline?
Basic processing
Once you have found the right kick drum sample and pitched it correctly, your next port of call is EQ.
Firstly, boost a tight EQ band and slowly sweep through the kick drum frequencies until you locate the fundamental (i.e. the ‘root note’ or ‘resonant frequency’), near the bottom. It will ring out very loud when your EQ band hits it.

Once you’ve found it, set the EQ band back to 0dB and use a steep high pass filter to cut out any lower frequencies. This will add clarity and headroom to the low end of your mix.

You can then use a gentle low pass filter to shave off any unnecessary higher frequencies and consider boosting the high-mids (around 1-3KHz) for some extra punch.

Don’t go overboard or make it complicated - remember with drum EQ, less is more.
Frequency slotting
For more definition between kick and bass, use an EQ band to boost the fundamental of your kick by 1-3dB.
On your bass channel, use a tight EQ band to reduce the same frequency by 2-3dB.
For example, if your kick has a fundamental of 90Hz then set a tight EQ band on your bass channel to 90Hz and reduce by 2-3dB. This creates a ‘slot’ for your kick to shine through.
Likewise, you can use EQ on your kick to reduce a frequency region that clashes with your upper bass parts.
For example, if there are higher notes in the bassline hitting around 120-150Hz, you can dip this region in your kick by 2-3dB. This allows the bass to cut through without lowering the impact of your kick’s fundamental.
 Kick EQ - boosted at fundamental, dipped widely at 200Hz to let bass top through. Boosted high-mids for clarity.
 Bass top EQ - peaking at 150 and 250Hz. Small dip for snare.
 Sub EQ - dipped at 70.6Hz to make space for kick fundamental
The key is to allocate separate frequency ranges for each element of your track to occupy. They all give way to each other.
Adding crunch
For extra crunch, add a second kick
Whether you copy the original kick or find a different one, remove the bottom and mid range with a high pass filter, then process the top end with saturation.

This gives you a separate ‘crunch’ channel which can be turned up or down without affecting the main kick volume.
Adding presence
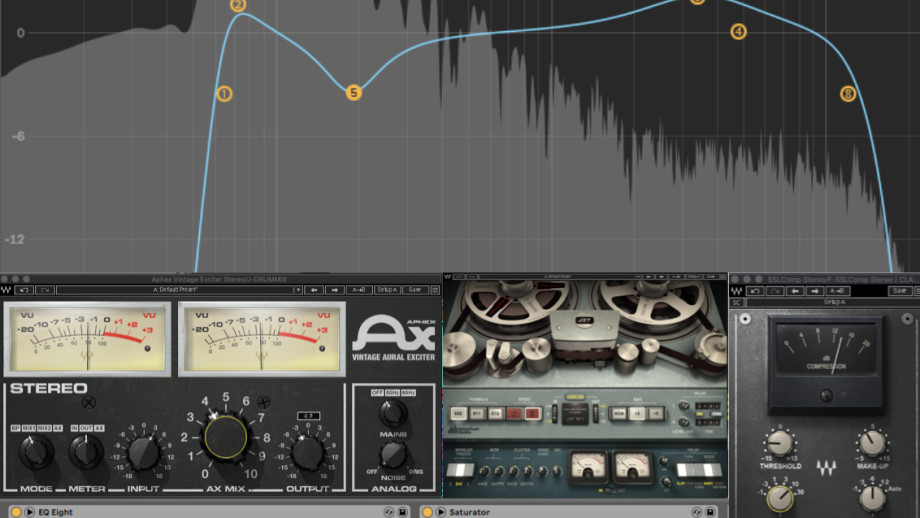
You can also add presence by running your final drum bus through a saturator, exciter or tape emulator.
 Waves J37 Plug-in - comes with varying tape modes plus saturation, noise, wow and flutter, Dry/Wet ratio
 Waves Aphex Vintage Exciter - boosts the volume of harmonics, with the AX Mix being Dry/Wet
The above processors will add harmonics and artifacts, so listen to the kick and check you’re happy with the tones that these processes create.
Some settings will add warmth and presence. Others will add frequencies that may not be desired.
Let’s talk about compression.
Parallel processing is a fantastic way of mixing kick compression. Ideally, you want a bus compressor, such as the Waves SSL, but standard compressors can work with the right attack and release settings.

Load your compressor into a parallel channel (sometimes called a ‘bus’ or ‘send/return’) and send the kick signal through. This gives you an uncompressed channel and a compressed channel that you can blend for your Dry/Wet ratio.
Set the threshold low and the ratio high. You want between -16 and -20dB of compression.
Set a relatively slow attack setting of around 10ms. This allows the transients to pass through unsquashed, meaning that the kicks retain their initial impact.
Set the release time longer. Between 600-1200ms depending on the tempo and how regular your kicks are. You want the compressor to ‘beef up’ the kick tails but you don’t want it interfering much with the next hits.
So, the busier your kick pattern, the shorter you might want to set the release.
Bringing it all together
Getting your desired kick sound starts with picking the right sample and pitching it appropriately.
If you’re stuck getting your kick right, open another channel and copy the pattern with another sample. Listen to new kicks at different pitches in context to the rest of your track and you will likely find a better fit.
The EQ comes down to a simple removal of unwanted frequencies and an optional boost of the fundamental and high-mids for presence.
More top-end presence can be added with saturation. You can use a ‘crunch’ kick, run your final drum bus through saturation, or both.
Compression is done in parallel. This gives you a dry kick channel and a heavily compressed kick channel which you can blend.
If you're ready to upgrade your music career, check out our amazing video courses and live sessions from today's best electronic artists and industry pros here at Virtuoso.
